1K Blog Marathon: Day 42
Do you want to change the background color of your favorite website?
Have you been wondering what a Chrome Extension is?
Chrome extensions (a.k.a. Chrome plugin) is a piece of software installed on your Chrome browser. This extensions aims to customize your browsing experience and even performs complex functionalities.
Basically, if you want to change the behavior or a website, or process certain things on it like copying all links, counting all words and even extracting keywords, but you can’t because the website doesn’t offer that feature, you can do it yourself using Chrome Extensions.
Chrome extensions are found on the top-right corner of the browser. Some can independently function like timer, while others are working only when you are in a particular website, like ProcFu for Podio website.

If you’re a newbie programmer who wants to perform different tasks in your Chrome browser, or a seasoned professional who wants to know how to create your own Chrome extension, this tutorial is best for you.
Few Technicalities
This tutorial’s prerequisite is basic HTML knowledge.
Basically, a Chrome Extension is composed of a Manifest file, HTML file, and a Javascript file. Optional files, like CSS can be used. Note that PHP files cannot be included as extensions run on the browser and not on a server. If you want to use PHP file, you need to put it on your server and call it via Javascript.
Chrome Extensions has 2 Actions
- Page Action – specific for a certain page, like Netflix Party that will work only on Netflix website.
- Browser Action – can function on all pages, example is Fonts Ninja that can identify fonts on any websites.
Types of Scripts
- Background Scripts
- Invisible page that works on background, like setting a timer.
- Content Scripts
- Can access the webpage which the user is interacting, ex. Change the site’s font style, background image, etc.
Let’s get our hands dirty!
In this tutorial, we will be creating a simple Chrome Extension that will show a small popup window when clicked.
We will only need 3 files:
- manifest.json – Manifest file in json format.
- popup.html – Simple website for interface.
- tab-icon.png – an image for logo.
Step 1
First, create a Manifest file. Open your text/code editor, create “manifest.json”, and paste the following codes:
{
	"name":"Curbside Notes",

	"author":"Xtian",

	"version":"1",

	"manifest_version": 2,

	"description":"Notepad? Sticky Notes? NO MORE!.",

	"icons":{
		"16":"tab-icon.png"
	},

	"browser_action":
	{
		"default_popup": "popup.html"
	}

}
Explanations:
- name – required, serves as the name of your project.
- author – optional, name of the author.
- version – required, version/revision number. It is advisable to use multiple number for versioning, like 0.0.1, if you have many revisions.
- manifest_version – required, the version of your manifest.
- description – optional, few texts to describe your extension.
- icons – required, this is the icon of your extension that will be shown in your browser once installed.
- browser_action: default_popup – required, tells the browser to show “popup.html” when the icon was clicked.
Step 2
Now create another file, name it “popup.html”, and save it on the same folder as the manifest. Paste this code.
<!DOCTYPE html>
<html lang="en">

<head>
    <title>Curbside Notes</title>
</head>

<style>
    body {
        height: 100px;
        width: 100px;
        padding: 20px;
        border: 1px solid #f4f4f4;
        background-color: azure;
    }
</style>

<body>

    HELLO WORLD!
    <br>
    <br>
    This is a simple Chrome Extension!

    <br>
    <br>
    Powered by Curbside Coder

</body>

</html>
Explanation:
This is just a simple html file, with on-page styling to make it more appealing, and few messages.
Step 3, the final and hardest step.
Last is download this image, rename it as “tab-icon.png”
Installation
There are two ways to install Chrome extensions. One is by downloading it from Chrome Store. This only works on Published Extension. Second is by uploading it locally from your computer to your browser. This is not published and only you can access it.
I will teach you how to install it locally.
1. Open your Chrome browser and navigate to chrome://extensions/. Optionally, you can click the Settings (vertical ellipsis on the top right corner of your browser) >> More Tools >> Extensions.
2. Enable “Developer mode”. You can see a switch toggle on the top right corner.
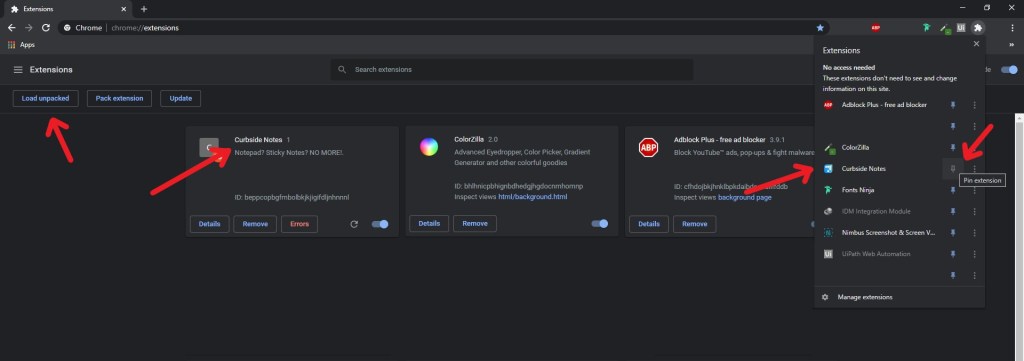
3. Click “Load unpacked”.
4. A popup window will appear. Browse your folder and select it.
5. Now you will be able to see it listed. Also it will appear on the extensions on the upper right corner of the browser, along with the other extensions you’ve installed.
6. If you didn’t see it on the extensions bar, click the puzzle icon, and “pin” the extension by clicking the pin icon next to it.
7. Now you have successfully created and installed your first Chrome Extension!

If you notice, Chrome Extension’s interface runs in HTML, which may make you think that you can create a web app and make it an extension! Technically you’re right, but as I’ve said earlier, you cannot use PHP. Come again for more elaborate Chrome Extension Project that I will post! Thank you and happy coding!
“And that’s one blog, stay hungry!”
“Extension of God’s glory brings about expansion”
Sunday Adelaja


Leave a comment